
Importing a Photographer’s CD
To Import a photographer’s CD:
1. From the Home screen, click the Import Photographer CD button ![]() .
.
2. Follow the directions as HJ Quick Panel guides you through the process.
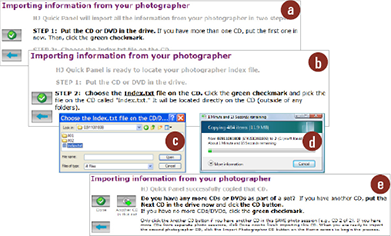
a. Insert the PSPA panel CD/DVD.
Click ![]() .
.
b. Navigate to the Index.txt file on the CD/DVD.
Click ![]() .
.
c. Select the Index.text file.
Click the Open button.
d. All image files will be copied the local drive.
e. If there are more CD/DVDs,
Click ![]() and repeat a through e.
and repeat a through e.
If there are no more CD/DVDs,
Click ![]() .
.
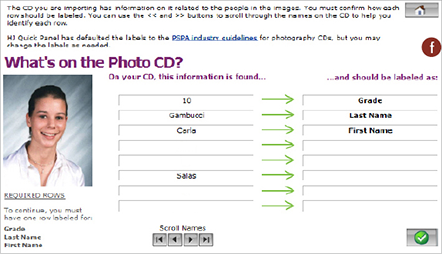
f. Match the CD information on the left with the categories on the right.
Include all sort/designation information.
Click ![]() .
.
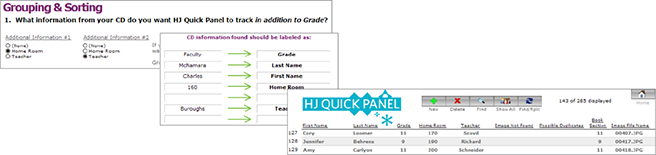
g. Select the categories to be tracked.
Click ![]() .
.
h. Select the panel organization method.
Click ![]() .
.
i. Select the missing image method.
Click ![]() .
.
j. If necessary, change the case of the names.
Click the appropriate button.
k. Quick Panel will show possible duplicates.
Click OK.
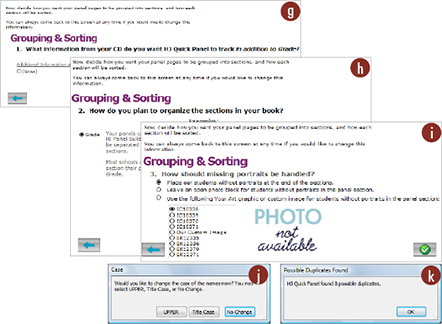
NOTE: Missing photo tags can be modified in Create/Edit Panel Sections.
Grouping and Sorting
Other than grade, Quick Panel allows the tracking of 2 additional fields. This could be teacher, homeroom, major, department, etc.
NOTE: Additional sort fields are setup during the import of the photographer’s CD.
NOTE: Improperly Formatted CD
While importing, HJ Quick Panel helps you resolve some basic importing issues.
• Names in the Index.txt file with no image listed.
• Image file name that isn’t on the CD.
• Targets possible duplicate names.
• Imports from multiple CDs.
• Scroll through names using ![]() , to match the appropriate fields.
, to match the appropriate fields.
• Tracks and sorts up to two additional fields (e.g., Home Room and Teacher).
• Setting the names to title case is a good idea.
![]() Click here to view the Import Portraits Video.
Click here to view the Import Portraits Video.
![]()
![]()
![]()
![]()