HJ Image In
Quickly place and crop digital images onto your layout. Image In also creates a new image file/folder in your spread’s folder.
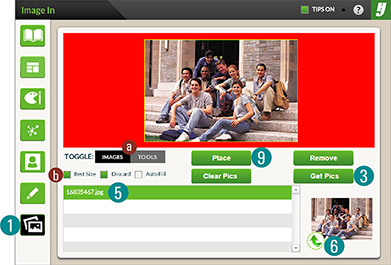
To place an image:
1. Click a frame and click Image In.
2. Switch to Images.
3. Click the Get Pics button.
4. Navigate/select/open images.
5. Select an image name.
6. Click the green Insert arrow.
7. Switch to the Tools.
8. Make Scale/Rotate adjustments.
9. Click the Place button.

Making adjustments in Image In
a. Switch to Tools/Switch to Image changes Image In’s control mode.
b. Use best size automatically uses the best size to fit the image frame.
Discard removes image names when placed on the layout.
Auto Fill loads all last images on startup.
c. The 150% stops the resolution from dropping below 250 ppi.
d. Use the Scale slider bar to resize the selected image.
e. Use the Rotation bar/buttons to rotate the selected image.
f. Fit to Frame scales the image to fill the frame.
g. Click Clear All Transformations to undo the above adjustments.
View images on the InDesign layout as you make Image In changes.
![]()
![]()